Firmware and JSON Files of the Lemokey QMK keyboards
This blog includes firmware and JSON files for the Lemokey L, P, and X series keyboards.
Keyboard Firmware
L series
L1:
*Firmware version 1.01 updated on January 9, 2024
*Firmware version 1.00 updated on March 18, 2024
L3:
*Firmware version 1.01 updated on August 17, 2023.
*Firmware version 1.00 updated on August 15, 2023.
P series
P1:
*Firmware version 1.0.0 updated on March 27, 2024
*Firmware version 1.0.0 updated on March 27, 2024
X series
X1:
*firmware version 1.01 updated on March 12th, 2024
X3:
*firmware version 1.00 updated on October 27th, 2023
X4:
*firmware version 1.0.2 updated on April 19th, 2024
X5:
*firmware version 1.0.0 updated on Dec. 6th, 2023
X6:
*firmware version 1.00 updated on Oct. 20th, 2023
JSON Files
X series
We recommend using the Launcher to update your firmware (see this blog How to Use the Launcher Web App to Flash Firmware for Your Lemokey Keyboard for steps). If the launcher fails to flash the keyboard firmware, you can try manually downloading the QMK toolbox and keyboard firmware by following these steps:
How to flash the keyboard firmware with the QMK toolbox
1. Slide the toggle to Cable / Wired mode and plug in power cable to your keyboard.
2. Download the keyboard firmware (see above on this page) and download the QMK Toolbox. (If the download link below does not work, use this link: https://github.com/qmk/qmk_toolbox/releases)
3. Unplug the cable from the keyboard.
4. Open the QMK Toolbox.
5. Remove the space bar keycap to find the reset button on the left side of the space bar switch on the PCB.

6. Press and hold the reset button, and plug in the power cable simultaneously. Do not release the reset button till the QMK Toolbox display in yellow words "***DFU device connected". This indicates that your keyboard has entered into DFU mode.
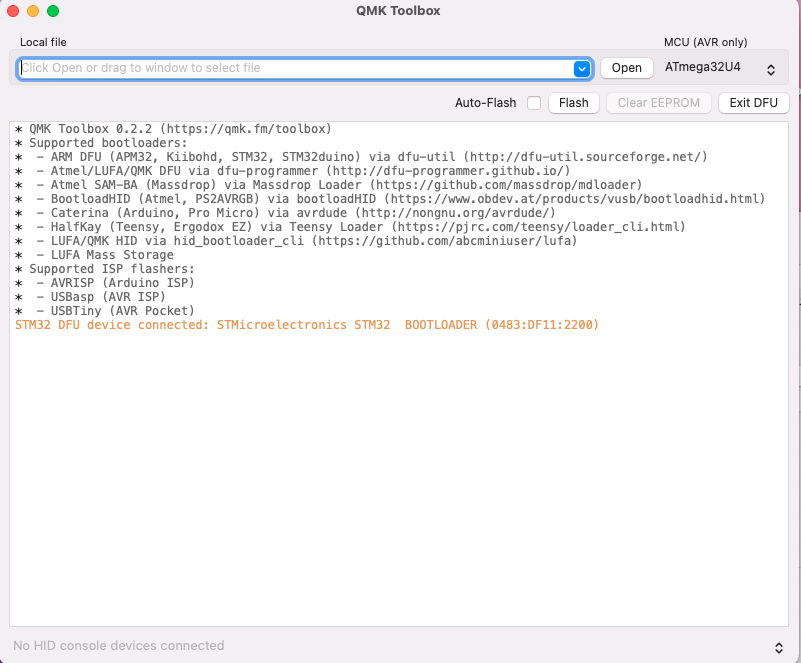
7. Click open and choose the firmware. Click the Flash button. It will start flashing. (Note: Do NOT unplug the power cable while it's flashing.)
8. Wait a few seconds and when you see the content below, it means the keyboard has flashed successfully factory reset.

If VIA can't pair with your Keychron QMK keyboard after you tried flashing, you need to follow these steps:
1. Reconnect your keyboard power cable.
2. If VIA still doesn’t pair together after you reconnect the power cable, download the keymap JSON file (see above on this page).
3. Open online VIA.
Step 1: Turn on "Show Design tab" on "SETTINGS" tab.
Step 2: Click on "Design" tab, then click on "Confirm".
Step 3: Drag the JSON file into the “Design” tab on the VIA.
Step 4: A window will pop out after you drag the JSON file, please click on your keyboard model and then click on "Connect".
4. VIA should pair together with the keyboard now.
You may contact support@lemokey.com if a defect covered by the warranty arises in your product within the warranty period. Lemokey will honor the warranty of our L, P and X series keyboards (e.g.: L1, L3, P1, X1, X3, X4, X5, X6, etc.) by one of the following methods at our discretion:
- Defects of L, P and X series keyboards have been caused by manufacturing: We will only replace the defective parts of the keyboard, not the whole keyboard, as it's highly customizable and easy to be rebuilt.
- Defects of L, P and X series keyboards have been caused by disassembling our product, improper installation, non-factory repairs/modifications, improper adjustment of the product, or neglect, including but not limited to “burn-in”, and similar wrongful use: We will NOT offer free service. We only offer PAID service to replace the defective parts at your own cost (including the cost of parts, shipping fee, and tax if applicable).